01 May How to screenshot on the iPhone SE
Know how to screenshot on the iPhone SE, as well as learning a few of it’s other tricks, is going to allow you to really use this phone to its full potential. You’ll be able to share all your favourite photos or important information with complete ease. Trust us, this will make your life a whole lot easier.
What is a screenshot?
Essentially, a screenshot is a photo of your device’s display, only you don’t need another device. This can also be referred to as a screengrab or screen capture. Your phone will take an image of the display you’re on when ordered to. You’re then able to either share this or edit it.
Not only do screenshots allow you to share information you love or store important details but they’re also a great way of communicating with others. For example, if you get an error message, it’s far easier to send a screenshot rather than try and explain it. It’s also great for quickly gathering any information that you may need.
How to screenshot on the iPhone SE
Screenshotting on the iPhone SE is a lot like screenshotting on the older generation iPhones. Of course, with the reintroduction of the home button, they’re going to want to use it properly. This form of screenshotting will allow you to capture the screen just as you can see it. You won’t get any moving screenshots. If the information you want to capture doesn’t fit into one screen, you will need to take multiple shots.
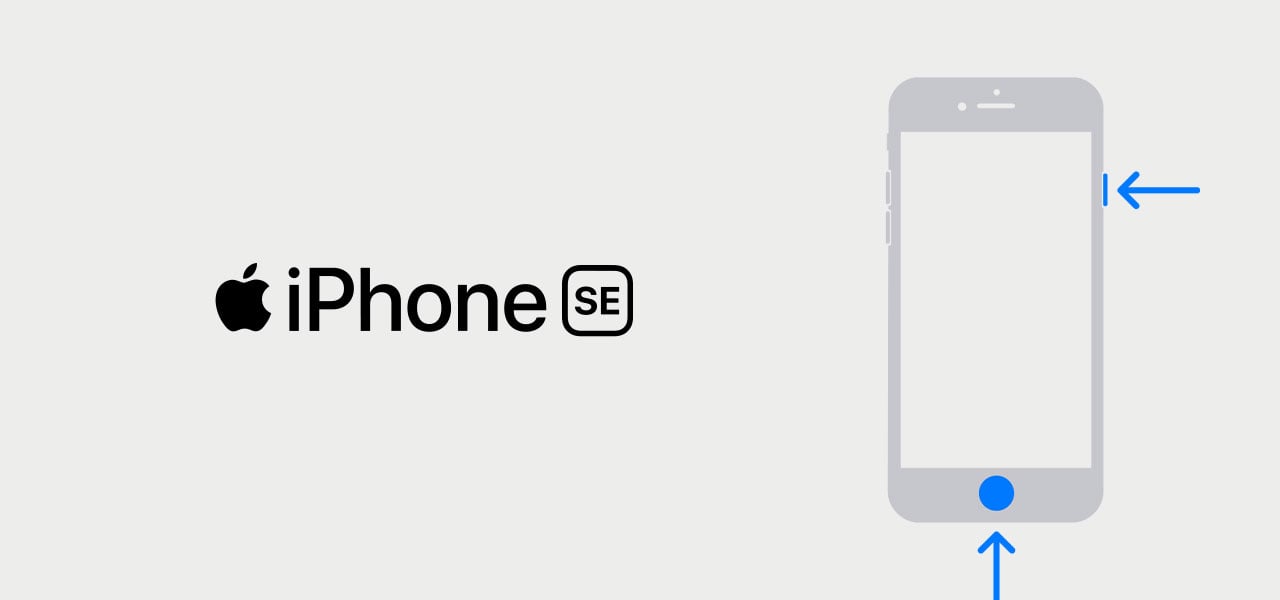
To take the screenshot, all you need to do is press the home button and lock button at the same time. You should hear a shutter noise as well as see the screen blink. This means your screen has been captured and you’re ready to share it!
Any screenshots will automatically save down to your photo gallery. From here, you can edit, crop or share the screenshot. Once you take the screenshot, you’ll get a pop up, if you click this, you can also edit the screen capture. Once you really get the hang of how to screenshot on the iPhone SE, it will come as second nature.
Screen recording on the iPhone SE
With an iPhone on the latest iOS update, you’ll be able to screen record as well. This is a fun little feature that allows you to capture videos or more information in one place. With screen recording, you can also choose to record the phone’s audio, no audio or audio through your phone. This is the perfect addition if you’re trying to explain something to something.
Before using this feature, you’re going to need to activate it. This is done by tapping into your Settings > Control Centre > Customise Controls and adding the screen recording option. You can do this using the + icon next to the recording picture. Now, whenever you want to screen record, you’ll be able to do so with the tap of a button. When you come to record your screen, all you need to do is swipe down from the top right of your phone to open the control centre. Tap the recording icon and you’ll have an on screen countdown. When you’re finished recording, just tap the rep time stamp in the top left corner and confirm the end of the recording.
You’ll see a notification pop up, alerting you that the screen recording has been saved to your photo gallery. Clicking this will open up the recording where you can crop, edit or share it. The video will also save down to your photo gallery, where you can always find it later.
With some of the best iPhone SE deals on the market, you’re bound to love this phone. Once you know how to screenshot on the iPhone SE, you’ll think it’s even more better than you already do!